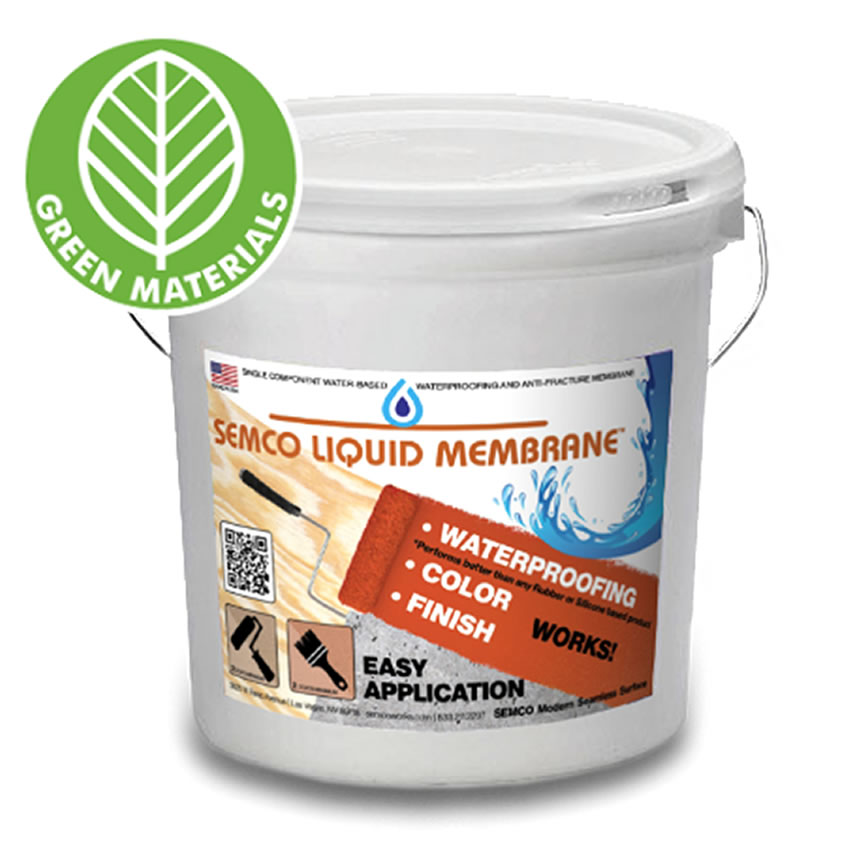
SEMCO Liquid Membrane™
Order SEMCO Liquid Membrane™ (Best Waterproofing Membrane) 1 Pint to 5 Gallon amounts and choose from various color options.

SEMCO Liquid Membrane™
Price range: $40.06 through $472.66
Easy to apply professional-grade waterproofing
The SEMCO Liquid Membrane™ is a single-component water-based waterproofing and anti-fracture membrane. It is a self-contained elastomeric fluid suspended in a copolymer adhesive, this revolutionary blend enables easy application while providing excellent bridging, and waterproofing.
Best Waterproofing Products for Wood, Metal and Concrete.

Watch Video ↑
SEMCO Liquid Membrane™ is the perfect self-adhering Membrane for waterproofing concrete and wood substrates. Use it for your shower, fountain, or pool interior and protect it from long-term water or moisture damage.
Basement waterproofing problems: with rain or from other sources such as irrigation or condensation, moisture can creep into your basement through your foundation walls or concrete ground slab.
The SEMCO Liquid Membrane is ready to use PREP/COAT/SEAL
- Waterproofing failures can cause the following problems:
- Mold, mildew, vegetative growth and odors
- Stains and rust
- Efflorescence and spalling of concrete or masonry that might eventually lead to serious structural concerns
- Deterioration of carpet and wood rot
- Delamination of existing wall and floor coverings
Additional information
| Weight | N/A |
|---|---|
| Dimensions | N/A |
| Size | 1 Pint – 20-25 sq f 2coats, 1 Quart – 40-50 sq f 2coats, 1 Gallon – 200-250 sq f 2coats, 5 Gallon – 1000-1250 sq f 2coats |
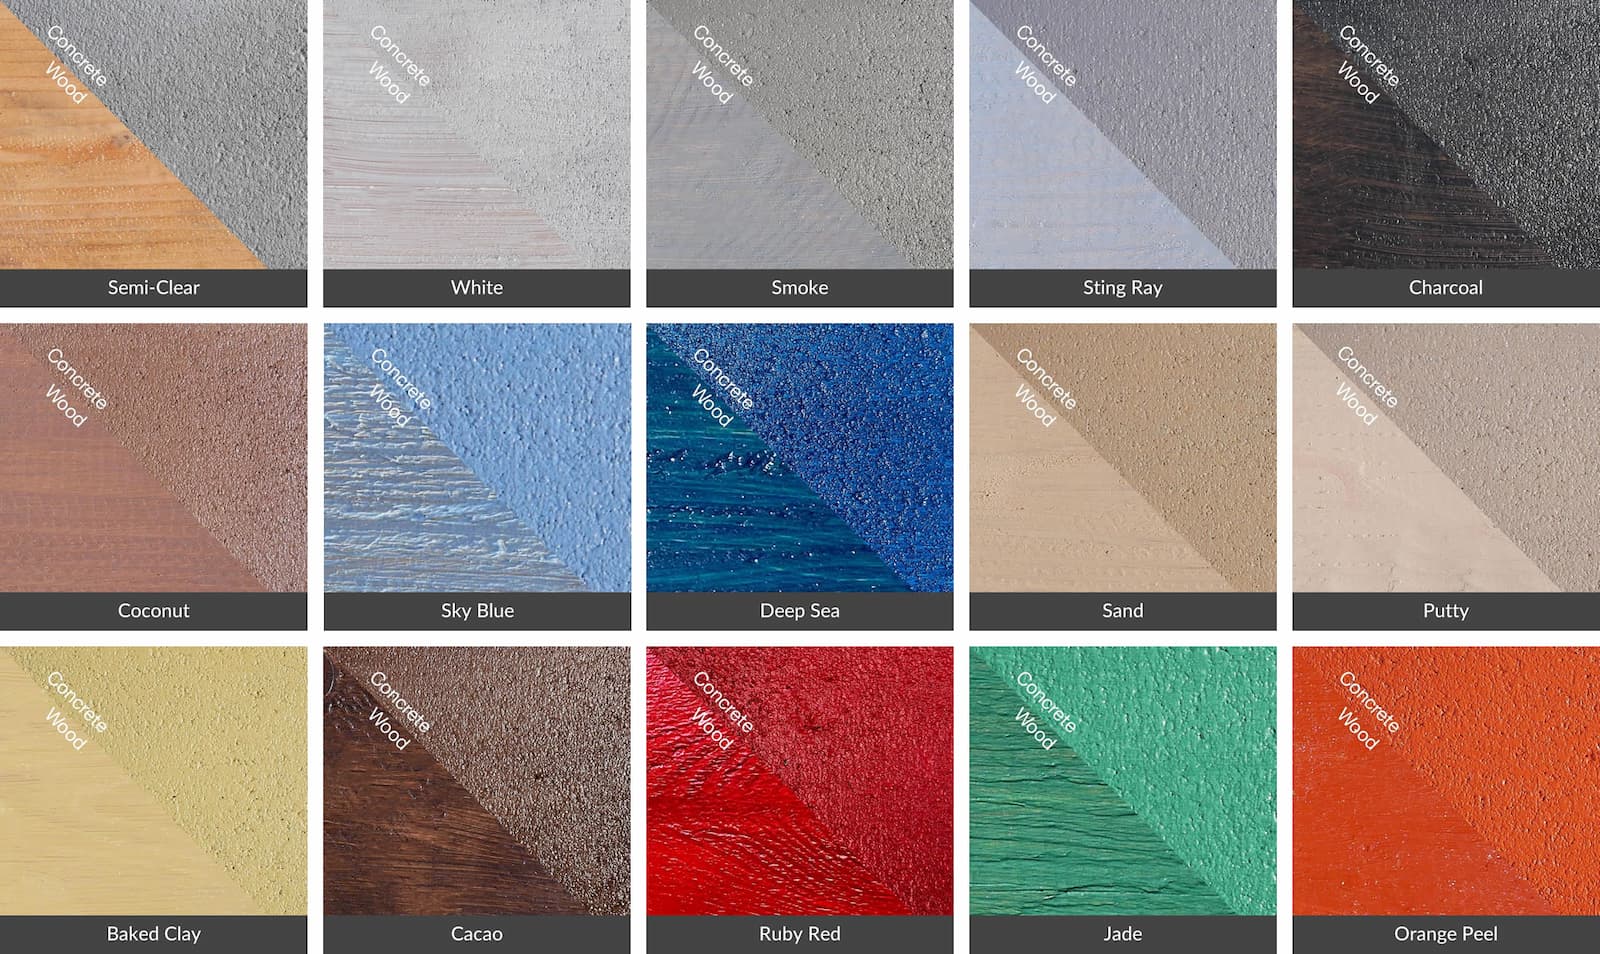
| Color | Semi-Clear, White, Smoke, Sting Ray, Charcoal, Coconut, Sky Blue, Deep Sea, Sand, Putty, Baked Clay, Cacao, Ruby Red, Jade, Orange Peel |
Step-By-Step Guides Specific To Your Waterproofing Membrane Project
1. Prepare your surface and Gather your materials
- For concrete or brick surfaces we recommend our Preparation D in order to remove any mineral deposits or efflorescence from the surface. For this you will need the following cleaners : Nu-Lift Cleaner and Stone Soap
- If there is constant dampness in the substrate, use Natural Shield first to mitigate the moisture. Let it fully cure first prior to applying SEMCO Liquid Membrane™ .
- Ensure your surfaces are fully cleaned and dried. Gather all the products and tools needed for your project.
2. Fabric Reinforcement
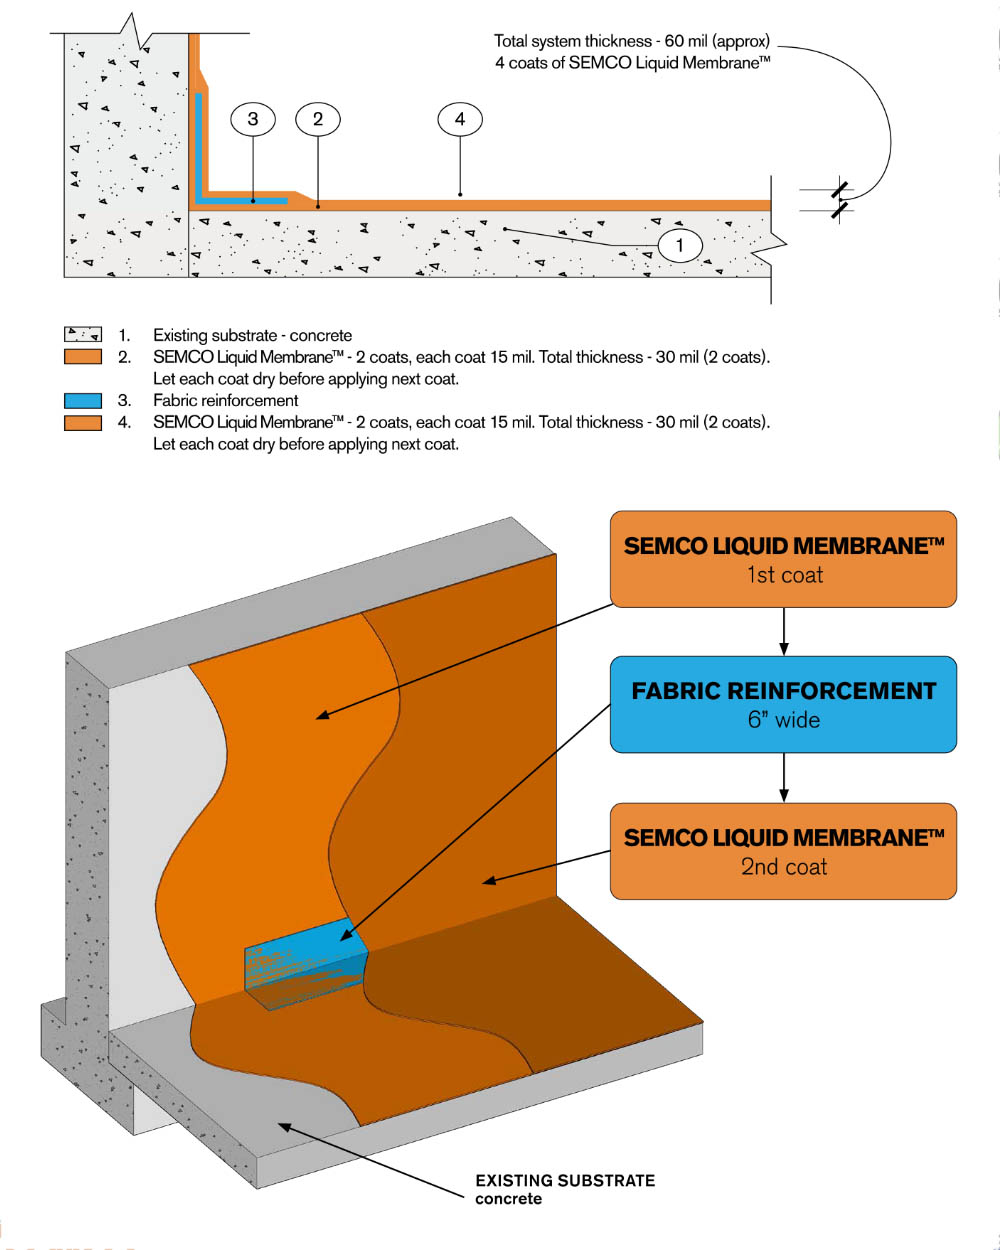
If you have any cracks wider than 1/4″, a Fabric Reinforcement is needed to bridge the crack. Any cracks smaller than 1/4″ width, SEMCO Liquid Membrane™ can be applied over it. To apply the Fabric Reinforcement, apply a generous coat of SEMCO Liquid Membrane™ over the crack. Put the Fabric Reinforcement on a press it flat, after 10-15 min apply another coat of SEMCO Liquid Membrane™ over the Fabric Reinforcement to encapsulate it. Let it dry to the touch before applying SEMCO Liquid Membrane™ over the entire surface.
3. Masking
Mask off areas that are not receiving any coating. Remove masking tape before material has fully cured.
4. Applying Coat
Use a 1/2″ nap roller. Allow any pre-treated areas to fully dry. Apply a thin coat (0.015 inch per coat) of SEMCO Liquid Membrane™ with brush or roller over substrate including pre-treated areas. Once you can walk on the surface and not get any residue on your shoe or feet or cannot leave a fingerprint impression it is ready to re-coat. Apply another thin coat of SEMCO Liquid Membrane™ in an alternate direction over the first coat of SEMCO Liquid Membrane™. Let topcoat dry to the touch, approximately 1–2 hours at 70 °F (21 °C) and 50% RH. When last coat has dried to the touch, inspect final surface for pinholes, voids, thin spots or other defects. SEMCO Liquid Membrane™ will dry to a lighter color when it’s dry to touch. Use additional SEMCO Liquid Membrane™ to seal the defects. Required total thickness is 0.03 – 0.04 inches for non submerged applications.
5. Curing Time
Curing time depends on temperature, humidity and airflow, however typically initial cure is within 6 – 7 days as per specific product recommendations.
6. Additional Information
- For clean up use warm water to clean brush or roller right after use.
- For optimal bonding we highly recommend preparing the surface as mentioned above for best results.
- Stir up the product well before use in order to mix up the color pigments.
- Avoid application in direct sun light in the afternoon or temperatures of over 85F as it might cause the product to dry too fast before it can adhere to the substrate
- Suitable for light foot traffic.For heavy foot traffic or vehicle traffic, we recommend using SEMCO Titan Shield Gloss.
- It can not be applied to wet substrates or substrates still containing moisture, else it will not cure correctly and stay tacky. Max. rest moisture in substrate can be up to 3%. If you are unsure about the moisture content, have it measured prior to application.
- For applications where the product is fully submerged, 3 coats @20mil each is required and allow a curing time of minimum 6-7 days.Also application must coat entire surface to above the waterline.
- Application on non porous surfaces such as metal or fiberglass : Apply thin coats as this will allow for the product to cure faster.
- Cure times are displayed in our curing chart. However if coats have been applied too thick, the surface might feel tacky. This is a sign of trapped moisture. If you have left over product, apply a very thin coat over the entire surface. The surface needs to be fully cured and hard before permitting water.
- For applications where SEMCO Liquid Membrane™ is applied on pool plaster, extended curing times might occur as plaster holds more moisture which needs to breath out first. A slight color change may occur when being in contact with water when the product has not fully cured yet. This however will not affect the performance of the SEMCO Liquid Membrane™.
- It is always advisable to apply a small test patch in an inconspicuous are to ensure adequate adhesion prior to full application.
1. Preparation
Sand the wood surface with a 60 grit sandpaper. Take off any loose coating and ensure surface is free of any debris
2. Masking
Mask off areas that are not receiving any coating. Remove masking tape before material has fully cured.
3. Applying Coat
Use a 1/2″ nap roller. Allow any pre-treated areas to fully dry. Apply a thin coat (0.015 inch per coat) of SEMCO Liquid Membrane™ with brush or roller over substrate including pre-treated areas. Once you can walk on the surface and not get any residue on your shoe or feet or cannot leave a fingerprint impression it is ready to re-coat. Apply another thin coat of SEMCO Liquid Membrane™ in an alternate direction over the first coat of SEMCO Liquid Membrane™. Let topcoat dry to the touch, approximately 1–2 hours at 70 °F (21 °C) and 50% RH. When last coat has dried to the touch, inspect final surface for pinholes, voids, thin spots or other defects. SEMCO Liquid Membrane™ will dry to a lighter color when it’s dry to touch. Use additional SEMCO Liquid Membrane™ to seal the defects. Required total thickness is 0.03 – 0.04 inches for non submerged applications.
4. Curing Time
Curing time depends on temperature, humidity and airflow, however typically initial cure is within 6 – 7 days as per specific product recommendations.
5. Additional Information
- For clean up use warm water to clean brush or roller right after use.
- For optimal bonding we highly recommend preparing the surface as mentioned above for best results.
- Stir up the product well before use in order to mix up the color pigments.
- Avoid application in direct sun light in the afternoon or temperatures of over 85F as it might cause the product to dry too fast before it can adhere to the substrate
- Suitable for light foot traffic.For heavy foot traffic or vehicle traffic, we recommend using SEMCO Titan Shield Gloss.
- It can not be applied to wet substrates or substrates still containing moisture, else it will not cure correctly and stay tacky. Max. rest moisture in substrate can be up to 3%. If you are unsure about the moisture content, have it measured prior to application.
- For applications where the product is fully submerged, 3 coats @20mil each is required and allow a curing time of minimum 6-7 days.Also application must coat entire surface to above the waterline.
- Application on non porous surfaces such as metal or fiberglass : Apply thin coats as this will allow for the product to cure faster.
- Cure times are displayed in our curing chart. However if coats have been applied too thick, the surface might feel tacky. This is a sign of trapped moisture. If you have left over product, apply a very thin coat over the entire surface. The surface needs to be fully cured and hard before permitting water.
- For applications where SEMCO Liquid Membrane™ is applied on pool plaster, extended curing times might occur as plaster holds more moisture which needs to breath out first. A slight color change may occur when being in contact with water when the product has not fully cured yet. This however will not affect the performance of the SEMCO Liquid Membrane™.
- It is always advisable to apply a small test patch in an inconspicuous are to ensure adequate adhesion prior to full application.
1. Prepare your surface and Gather your materials
- For concrete or gunnite surfaces we recommend our Preparation D in order to remove any mineral deposits or efflorescence from the surface. For this you will need the following cleaners : Nu-Lift Cleaner and Stone Soap
- For fiberglass surfaces it is required to sand the entire surface first with a 60 grit. Afterwards use Preparation B.For this you will need the following cleaners : Power Cleaner and Stone Soap
- If there is constant dampness in the substrate, use Natural Shield first to mitigate the moisture. Let it fully cure first prior to applying SEMCO Liquid Membrane™ .
- Ensure your surfaces are fully cleaned and dried. Gather all the products and tools needed for your project.
2. Fabric Reinforcement
If you have any cracks wider than 1/4″, a Fabric Reinforcement is needed to bridge the crack. Any cracks smaller than 1/4″ width, SEMCO Liquid Membrane™ can be applied over it. To apply the Fabric Reinforcement, apply a generous coat of SEMCO Liquid Membrane™ over the crack. Put the Fabric Reinforcement on a press it flat, after 10-15 min apply another coat of SEMCO Liquid Membrane™ over the Fabric Reinforcement to encapsulate it. Let it dry to the touch before applying SEMCO Liquid Membrane™ over the entire surface.
3. Masking
Mask off areas that are not receiving any coating. Remove masking tape before material has fully cured.
4. Applying Coat
Use a 1/2″ nap roller. Allow any pre-treated areas to fully dry. Apply a thin coat (0.015 inch per coat) of SEMCO Liquid Membrane™ with brush or roller over substrate including pre-treated areas. Once you can walk on the surface and not get any residue on your shoe or feet or cannot leave a fingerprint impression it is ready to re-coat. Apply another thin coat of SEMCO Liquid Membrane™ in an alternate direction over the first coat of SEMCO Liquid Membrane™. Let topcoat dry to the touch, approximately 1–2 hours at 70 °F (21 °C) and 50% RH. When last coat has dried to the touch, inspect final surface for pinholes, voids, thin spots or other defects. SEMCO Liquid Membrane™ will dry to a lighter color when it’s dry to touch. Use additional SEMCO Liquid Membrane™ to seal the defects. Required total thickness is 0.03 – 0.04 inches for non submerged applications.
5. Curing Time
Curing time depends on temperature, humidity and airflow, however typically initial cure is within 6 – 7 days as per specific product recommendations.
6. Additional Information
- For clean up use warm water to clean brush or roller right after use.
- For optimal bonding we highly recommend preparing the surface as mentioned above for best results.
- Stir up the product well before use in order to mix up the color pigments.
- Avoid application in direct sun light in the afternoon or temperatures of over 85F as it might cause the product to dry too fast before it can adhere to the substrate
- Suitable for light foot traffic.For heavy foot traffic or vehicle traffic, we recommend using SEMCO Titan Shield Gloss.
- It can not be applied to wet substrates or substrates still containing moisture, else it will not cure correctly and stay tacky. Max. rest moisture in substrate can be up to 3%. If you are unsure about the moisture content, have it measured prior to application.
- For applications where the product is fully submerged, 3 coats @20mil each is required and allow a curing time of minimum 6-7 days.Also application must coat entire surface to above the waterline.
- Application on non porous surfaces such as metal or fiberglass : Apply thin coats as this will allow for the product to cure faster.
- Cure times are displayed in our curing chart. However if coats have been applied too thick, the surface might feel tacky. This is a sign of trapped moisture. If you have left over product, apply a very thin coat over the entire surface. The surface needs to be fully cured and hard before permitting water.
- For applications where SEMCO Liquid Membrane™ is applied on pool plaster, extended curing times might occur as plaster holds more moisture which needs to breath out first. A slight color change may occur when being in contact with water when the product has not fully cured yet. This however will not affect the performance of the SEMCO Liquid Membrane™.
- It is always advisable to apply a small test patch in an inconspicuous are to ensure adequate adhesion prior to full application.
1. Prepare your surface and Gather your materials
- For bare concrete or water based coatings we recommend our Preparation D in order to remove any mineral deposits or efflorescence from the surface. For this you will need the following cleaners : Nu-Lift Cleaner and Stone Soap
- For asphalt, rubber and EPDM surfaces we recommend Preparation B.For this you will need the following cleaners : Power Cleaner and Stone Soap
- Ensure your surfaces are fully cleaned and dried. Gather all the products and tools needed for your project.
2. Fabric Reinforcement
If you have any cracks wider than 1/4″, a Fabric Reinforcement is needed to bridge the crack. Any cracks smaller than 1/4″ width, SEMCO Liquid Membrane™ can be applied over it. To apply the Fabric Reinforcement, apply a generous coat of SEMCO Liquid Membrane™ over the crack. Put the Fabric Reinforcement on a press it flat, after 10-15 min apply another coat of SEMCO Liquid Membrane™ over the Fabric Reinforcement to encapsulate it. Let it dry to the touch before applying SEMCO Liquid Membrane™ over the entire surface.
3. Masking
Mask off areas that are not receiving any coating. Remove masking tape before material has fully cured.
4. Applying Coat
Use a 1/2″ nap roller. Allow any pre-treated areas to fully dry. Apply a thin coat (0.015 inch per coat) of SEMCO Liquid Membrane™ with brush or roller over substrate including pre-treated areas. Once you can walk on the surface and not get any residue on your shoe or feet or cannot leave a fingerprint impression it is ready to re-coat. Apply another thin coat of SEMCO Liquid Membrane™ in an alternate direction over the first coat of SEMCO Liquid Membrane™. Let topcoat dry to the touch, approximately 1–2 hours at 70 °F (21 °C) and 50% RH. When last coat has dried to the touch, inspect final surface for pinholes, voids, thin spots or other defects. SEMCO Liquid Membrane™ will dry to a lighter color when it’s dry to touch. Use additional SEMCO Liquid Membrane™ to seal the defects. Required total thickness is 0.03 – 0.04 inches for non submerged applications.
5. Curing Time
Curing time depends on temperature, humidity and airflow, however typically initial cure is within 6 – 7 days as per specific product recommendations.
6. Additional Information
- For clean up use warm water to clean brush or roller right after use.
- For optimal bonding we highly recommend preparing the surface as mentioned above for best results.
- Stir up the product well before use in order to mix up the color pigments.
- Avoid application in direct sun light in the afternoon or temperatures of over 85F as it might cause the product to dry too fast before it can adhere to the substrate
- Suitable for light foot traffic.For heavy foot traffic or vehicle traffic, we recommend using SEMCO Titan Shield Gloss.
- It can not be applied to wet substrates or substrates still containing moisture, else it will not cure correctly and stay tacky. Max. rest moisture in substrate can be up to 3%. If you are unsure about the moisture content, have it measured prior to application.
- For applications where the product is fully submerged, 3 coats @20mil each is required and allow a curing time of minimum 6-7 days.Also application must coat entire surface to above the waterline.
- Application on non porous surfaces such as metal or fiberglass : Apply thin coats as this will allow for the product to cure faster.
- Cure times are displayed in our curing chart. However if coats have been applied too thick, the surface might feel tacky. This is a sign of trapped moisture. If you have left over product, apply a very thin coat over the entire surface. The surface needs to be fully cured and hard before permitting water.
- For applications where SEMCO Liquid Membrane™ is applied on pool plaster, extended curing times might occur as plaster holds more moisture which needs to breath out first. A slight color change may occur when being in contact with water when the product has not fully cured yet. This however will not affect the performance of the SEMCO Liquid Membrane™.
- It is always advisable to apply a small test patch in an inconspicuous are to ensure adequate adhesion prior to full application.
1. Prepare your surface and Gather your materials
- For bare concrete or water based coatings we recommend our Preparation D in order to remove any mineral deposits or efflorescence from the surface. For this you will need the following cleaners : Nu-Lift Cleaner and Stone Soap
- For concrete surfaces with oil stains or grease we recommend Preparation B.For this you will need the following cleaners : Power Cleaner and Stone Soap
- Ensure your surfaces are fully cleaned and dried. Gather all the products and tools needed for your project.
2. Fabric Reinforcement
If you have any cracks wider than 1/4″, a Fabric Reinforcement is needed to bridge the crack. Any cracks smaller than 1/4″ width, SEMCO Liquid Membrane™ can be applied over it. To apply the Fabric Reinforcement, apply a generous coat of SEMCO Liquid Membrane™ over the crack. Put the Fabric Reinforcement on a press it flat, after 10-15 min apply another coat of SEMCO Liquid Membrane™ over the Fabric Reinforcement to encapsulate it. Let it dry to the touch before applying SEMCO Liquid Membrane™ over the entire surface.
3. Masking
Mask off areas that are not receiving any coating. Remove masking tape before material has fully cured.
4. Applying Coat
Use a 1/2″ nap roller. Allow any pre-treated areas to fully dry. Apply a thin coat (0.015 inch per coat) of SEMCO Liquid Membrane™ with brush or roller over substrate including pre-treated areas. Once you can walk on the surface and not get any residue on your shoe or feet or cannot leave a fingerprint impression it is ready to re-coat. Apply another thin coat of SEMCO Liquid Membrane™ in an alternate direction over the first coat of SEMCO Liquid Membrane™. Let topcoat dry to the touch, approximately 1–2 hours at 70 °F (21 °C) and 50% RH. When last coat has dried to the touch, inspect final surface for pinholes, voids, thin spots or other defects. SEMCO Liquid Membrane™ will dry to a lighter color when it’s dry to touch. Use additional SEMCO Liquid Membrane™ to seal the defects. Required total thickness is 0.03 – 0.04 inches for non submerged applications.
5. Curing Time
Curing time depends on temperature, humidity and airflow, however typically initial cure is within 6 – 7 days as per specific product recommendations.
6. Additional Information
- For clean up use warm water to clean brush or roller right after use.
- For optimal bonding we highly recommend preparing the surface as mentioned above for best results.
- Stir up the product well before use in order to mix up the color pigments.
- Avoid application in direct sun light in the afternoon or temperatures of over 85F as it might cause the product to dry too fast before it can adhere to the substrate
- Suitable for light foot traffic.For heavy foot traffic or vehicle traffic, we recommend using SEMCO Titan Shield Gloss.
- It can not be applied to wet substrates or substrates still containing moisture, else it will not cure correctly and stay tacky. Max. rest moisture in substrate can be up to 3%. If you are unsure about the moisture content, have it measured prior to application.
- For applications where the product is fully submerged, 3 coats @20mil each is required and allow a curing time of minimum 6-7 days.Also application must coat entire surface to above the waterline.
- Application on non porous surfaces such as metal or fiberglass : Apply thin coats as this will allow for the product to cure faster.
- Cure times are displayed in our curing chart. However if coats have been applied too thick, the surface might feel tacky. This is a sign of trapped moisture. If you have left over product, apply a very thin coat over the entire surface. The surface needs to be fully cured and hard before permitting water.
- For applications where SEMCO Liquid Membrane™ is applied on pool plaster, extended curing times might occur as plaster holds more moisture which needs to breath out first. A slight color change may occur when being in contact with water when the product has not fully cured yet. This however will not affect the performance of the SEMCO Liquid Membrane™.
- It is always advisable to apply a small test patch in an inconspicuous are to ensure adequate adhesion prior to full application.
The Semco resurfacing products are a great option for a wide variety of spaces and projects. Semco surface solutions can be used in residential and commercial bathrooms, driveways and garages, exterior walkways, pool decks, roof decks, exterior facades, interior walls and stairs.
Phone: 954-852-7281
SEMCO FLorida
6000 Park of Commerce Blvd, Suite C
Boca Raton, FL 33487
Concrete, Tile, Wall, Pool Deck, Driveway, Waterproofing +
- Tile Resurfacing Kits
- Tile Resurfacing & Restoration
- Microcement
- Pools Decks
- Paver Repair (Resurfacing)
- Concrete Resurfacing & Refinishing
- Garage Floor Resurfacing
- Decorative Concrete Resurfacing
- Concrete Wall Finishes
- Concrete Crack Repair
- Facade Resurfacing
- Waterproofing (Liquid Membrane)
- Public Works
SEMCO Florida –
Had a cement water feature with falls and a pond with small leak and tried a lot of things to stop the leak and nothing worked. I purchased the SEMCO waterproofing membrane and applied two coat and the Pond is staying at the correct level! – Tim H
SEMCO Florida –
Ordered Liquid Membrane charcoal color and works great on my wood surface. – Ryan S.
SEMCO Florida –
Applied the Liquid Waterproofing Membrane over my concrete home deck as it was leaking on some parts. Been holding up well ever since and I am super happy about it! – Jared W.
SEMCO Florida –
Used on the exterior of my home and no moisture problems throughout the winter! It Works!!! – Sarah K.